We all know that we use PowerPoint to create slides that we can show during a presentation. We can also use PowerPoint to create Notes pages and Handouts.
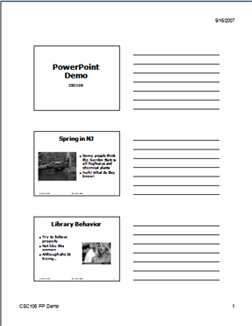
Handouts are printouts of our slides that contain smaller copies of the slides, so that multiple slides fit on one page. They can be given out to the audience members for their reference, or for them to use to take notes. You can choose how many slides will appear on each page of the handouts; here are examples of two possibilities:
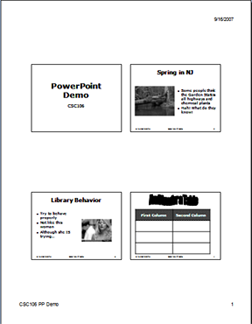
Notes pages are for the speaker. In the past, many people were trained to use index cards to contain the notes they need to use during their presentation. With PowerPoint this is no longer necessary, because PowerPoint allows us to create notes to go with each slide. We can then print our presentation as Notes, which puts a copy of each slide on one page, along with the notes we wrote to go with that slide. We can then use these Notes pages during the presentation rather than index cards. Here is an example of one Notes page:

To create a new presentation, click on the office button and choose New. You have the choice to create either:
The templates and themes can be found on your computer and online. If you search online you will find both templates and themes.
Use the Design tab to modify the slide design. You can choose or change the theme used. Mousing over a theme will cause PowerPoint to display the current slide in that theme. If you click on the theme, it will change your presentation to that theme.
You can modify the chosen theme using the following:
The command to add a new slide is on the Home tab. It is grouped with the Slide Layout command. The slide layout determines the format for the information on the current slide (one column, two columns, title only, etc.)
If you want to change the layout of an existing slide, right click on the slide and choose Layout... from the pop up menu.
The Home tab contains most basic editing commands:
The mini toolbar will automatically appear with text formatting commands when you select text with your mouse. In addition, once you have added elements such as text, pictures, etc., you can right click on the element to bring up a menu with many formatting options. Right clicking on text gives you the option to edit the font (style, size, color, etc.), paragraph, bullets, and more.
You can add the date/time, slide number, and a title on the bottom of each slide. This is done by adding a footer. You can also add a header and footer to appear on the notes and handouts pages. On the Insert tab, select the Header and Footer, Date and Time, or Slide Number commands. All of these commands open the dialog box for footers. You can control the format of the footer on slides (do you want a page number, date/time, and footer text) and on notes/handouts.
For the date and time you can choose to have a date and time that is updated automatically (changed to the current date and time each time you open the presentation) and you can choose the format in which it will be displayed. If you prefer, you can choose to enter a fixed date and time that will always appear when the presentation is opened.
You can choose whether or not to include page numbers at the bottom of each slide, and you can enter some text (such as your name and/or the title of your presentation) in the footer on each slide.
You have the option of applying the footer settings to all slides or just the current slide, and you can decide whether you want the footer to appear on the title slide.
The options for notes and handouts are similar, with the addition of the ability to add header text, which is not possible on slides.
There are several types of content you can insert into a slide. You can insert slides from a different presentations, pictures, videos, sounds, smart art, word art, tables, charts, and more. There are also several different methods for inserting this content. With all of these methods, it is important to store the content in the same folder as the presentation.
Some slide layouts (such as Title and Content, Two Content, Comparison, and Content with Caption) contain icons you can use to insert content:
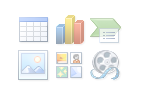
The icons (from left to right, top row and then bottom row) allow you to insert a table, chart, smart art, picture from file, clip art, or media clip. Clicking on one of these icons will bring up a dialog box that will allow you to specify the file that contains the content you would like to add.
You can add content to any slide, even if it doesn't contain the content icons, by selecting the Insert tab. You will find the content types listed above along with additional content types, such as word art and shapes.
To add a picture: click on the picture from file icon, or click on the Insert tab and choose the Picture command. A file browser dialog box will appear so you can choose the image file. Once your picture is inserted you can move it and change the size. The picture tab opens, which contains lots of options for editing your picture, include cropping, rotating, adjusting brightness, changing the shape, adding a border, and lots more.
To add clip art: click on the clip art icon, or click on the Insert tab and choose the Clip Art command. The Clip Art Task Pane will open. In the Task Pane, for Search in, choose Everywhere. This will give you access to clip art on your computer and on the Microsoft web site. For Results should be, choose all media types to get clip art, photos, and media files, or choose clip art to get just clip art. Then enter a keyword for the type of image you're looking for (computer, house, medicine, etc.). Browse through the clip art results and click on the image you want. Once your clip art is inserted you can move it and change the size.
Word Art is text that is formatted in one of a set of banner-type styles. To add Word Art: click on the Insert tab and choose the Word Art command. A dialog box allows you to choose the style of Word Art you prefer; a Word Art box appears where you enter the text you want formatted as Word Art. You can move or resize the Word Art and there are many options for changing the style using the Format tab that appears.
To add a video: click on the media clip icon, or click on the Insert tab and choose the Insert Movie command. A file browser dialog box will appear so you can choose the video file. PowerPoint will ask whether the video should play automatically when the slide is displayed, or whether it should play once you click on it. Choose the option you prefer and your video will be inserted. You can move it and change the size, and set many other options using the Movie Tools tab that appears.
To add a table to a slide: click on the table icon, or click on the Insert tab and choose the Table command. If you use the table icon, a dialog box will allow you to specify the number of rows and columns. Remember that rows go across and columns go up and down. If you use the Table command on the Insert tab, a grid will pop up, which you can use to choose the number of rows and columns by moving your mouse to highlight the shape of the table you would like. Once your table is inserted you can move it or resize the rows and/or columns. Click in each cell to enter text in the cell.
Once you enter a table, the Table Tools tabs (Design and Layout) appear. You can control many aspects of the appearance of your table. You can choose a style for your table, you can specify the vertical alignment of data in a cell or group of cells, you can control whether the table borders are displayed and how the borders are formatted, you can make sure that all rows are the same height, you can make sure that all columns are the same width, and more.
You can insert a link in your presentation, which can link to a web page or to another slide in your presentation. To create a link, on the Insert tab, choose the Hyperlink command. This opens the Insert Hyperlink dialog box. On the left side, choose Existing File or Web Page to link to a web page, or choose Place in This Document to link to a slide within the presentation.
If you choose to link to a web page, then you must type in the URL in the Address box, and type in the text you want to see for the link in the Text to display box. This is the text you will see in the slide that will link to the page you have chosen.
If you choose to link to a place in this document, then choose the slide you want to link to. You can pick this slide from the list shown under Select a place in this document. You must also type in the text you want to see for the link in the Text to display box. This is the text you will see in the current slide that will link to the slide you have chosen.
If you would like an image to be the link, first add the image to your
presentation. Then select the link and insert a hyperlink. In the
Insert Hyperlink dialog box you will see that it says
"< To insert a spreadsheet into your presentation, open the spreadsheet in
Excel, highlight the cells you want to include in your presentation, right
click, and then choose copy from the pop-up menu. Switch to PowerPoint, and move
to the slide that will contain the spreadsheet. Choose Title and Content
for the slide layout. On the Home tab, choose the drop down arrow under
the Paste command. From the drop down menu, choose Paste Special.
This opens the Paste Special dialog box. You can paste the spreadsheet as either
an Excel Worksheet object or as a picture. After you paste you can move or
resize the spreadsheet. If you paste as a picture you will not have gridlines
separating the cells of the spreadsheet. Be careful when inserting spreadsheets; the spreadsheet must contain only
a few cells or the text will be too small for your audience to read. To insert a chart into your presentation, open the chart in
Excel, click on the chart to select it (you will see black boxes on the
corners and borders of the chart), right
click, and then choose copy from the pop-up menu. Switch to PowerPoint, and move
to the slide that will contain the chart. Choose Title and Content
for the slide layout. Then paste the chart into the desired slide.
If the chart has a title, it will look better if you delete the title
from the chart, and instead use it as the title for the slide.
Slide Masters allow you to specify formatting that will be used on every slide.
There are masters for formatting slides, handouts, and notes. To edit the slide
master, go to the View tab and choose the Slide Master
command. This opens the Slide Master tab which contains many options
for changing the format of the master slides. You will see thumbnails of the
slide masters on the left side
of the screen. The thumbnail at the top is for the master that
applies to all slides. Below that are masters for each of the slide layouts.
If you change the format of something
on the master (change the font, color, style of bullets, etc.), it will be
changed on all slides of that layout in the presentation.
Remember that the masters are for changing the
formatting on all relevant slides in the presentation;
therefore you should never enter content on a master slide.
When you are done editing, choose
Close Master View from the Slide Master View toolbar.
Slide transitions determine how slides enter the screen. You can set the
transition for a single slide or for all slides in the presentation. Go to
the Animations tab and use the commands in the Transition
to this slide group. You can choose the transition you want to use,
the speed of the transition, a sound to play during transition, and whether
to apply this transition to all slides or just the current slide. Animations determine actions taken when specific objects enter the slide,
exit the slide, or for emphasis of the object. To add an animation, select
the object (text, image, etc.) and choose the Animations tab. Simple
animations can be added by clicking on the drop down arrow for Animations
in the Animations group. More advanced animations can be added by
clicking on the Custom Animation command. This opens the Animations
task pane, which allows you to add entrance, emphasis, and exit effects.
Once you have added an effect, you can right click on the effect in the
task pane and change the options, such as adding a sound and determining
whether to start the animation automatically or to require a mouse click.
You can find some information about PowerPoint on the web. There is not a
huge amount of information since PowerPoint 2007 is still fairly new.
Here are links to some resources that might be helpful:
Email Me |
Office Hours |
My Home Page |
Department Home |
MCC Home Page
Insert Spreadsheets and Charts
Slide Masters
Slide Transitions and Animations
Web Tutorials
© Copyright Emmi Schatz 2007