Mainframe Express
Mainframe Express is an integrated environment for developing
mainframe applications on a PC. Mainframe Express supports COBOL,
PL/I, Assembler, CICS, IMS and DB2. We will only be using the
Assembler capabilities of the package.
There are five steps required to create and run an Assembler
program:
- Create a project for the program
- Create the source file
- Add the source file to the project
- Build the project
- Execute/Debug the program
Creating a Project
A project lists all the files that make up your program, and specifies
how each should be compiled. In general, this could include multiple
source files. In our class, we will usually have only one source file
for each program.
The project information is stored in a file with the extension
.mvp. To keep your files organized, you might want to create a
directory for each lab, and store all files that are part of that lab,
including the project file, in that directory.
To create a new project:
- Click New on the File menu, or click on the
New button
 on the toolbar.
- In the dialog box that appears, click Project, then click OK.
- The first page of the Project Wizard appears. Enter the name
of your project. The directory where you want to save the
project defaults to a directory on the C: drive with the the same
name as your project. Change
this to a directory on the A: drive with the same name as
your project. Then click on Next.
- In the next page, you can specify whether you will enter
details of the new project, or want it based on an existing one.
Accept the default, Using this wizard, and click Next.
- In this page you can specify where you want the catalog for
this project to be created. The catalog emulates the catalog on a
mainframe, which keeps track of the physical properties and
locations of the data files used by the application. By default,
the catalog is created in the project folder. Leave the default
unchanged, and click Next.
- In this page you specify whether your project will use any
of the available mainframe databases. Unclick all three options.
Click Next.
- Click Finish. The Project View window will open.
This window contains a list of files and directories that are
part of your project.
Creating a Source File
The source file contains your assembler program. To create a
source file:
- Click New on the File menu, or click on the
New button on the toolbar.
- In the dialog box that appears, click Source File, then click
OK.
- A source window opens where you can type your program. There
is one line visible in the window which says "end of text".
Move your cursor to the beginning of this line and start
entering your code. The default file type for Mainframe Express
is COBOL, and therefore the source window contains highlighting
that is consistent with the formatting of COBOL statements. To
change the highlighting (if it bothers you), save your program
as an Assembler program by following the directions in the next
item.
- To save your program, click Save or Save As from
the File menu, or click on the Save button
 on the toolbar. The Save As dialog box appears. The
directory will be set to the directory for the project, so do
not change it. The Save as type near the bottom of the
window will be set to COBOL. You must change this to
Assembler Files (*.MLC,*.ASM,*.BAL,*.CAP). To find
this entry you must scroll up in the list from COBOL.
Enter a name for your source file. You must include the
extension .MLC in your filename. Click on the
Save button.
on the toolbar. The Save As dialog box appears. The
directory will be set to the directory for the project, so do
not change it. The Save as type near the bottom of the
window will be set to COBOL. You must change this to
Assembler Files (*.MLC,*.ASM,*.BAL,*.CAP). To find
this entry you must scroll up in the list from COBOL.
Enter a name for your source file. You must include the
extension .MLC in your filename. Click on the
Save button.
Adding a Source File to the Project
After the source file has been created, it must be added to the project:
- Click Add Files on the Project menu.
- This opens the Add Files to Project dialog box,
where you can select files to add. Click on your source file,
click on the Addbutton, and then click on the Done
button. Your file will now appear in the Project View
window.
Assembling and Linking Your Program (Building the Project)
In Mainframe Express, you assemble and link your program by building
the project. During a build, Mainframe Express assembles each source file
that has been changed since the last build, includes the source for any
macros and subroutines used, and creates the executable. To build your
project, simply choose Build from the Build menu, or
click on the build button
 .
.
If your build finishes with errors, scroll back to the error message(s)
in the Build window at the bottom of your screen. Double click on the
error message and it will show you the statement which has an error.
Executing Your Program
In Mainframe Express, your program runs in a popup window which
allows you to execute the program without interruption, or to step
through the program and examine variables during execution. To run
your program:
- Click Run or Start Debugging on the
Debug menu, or click on the Run button
 .
.
- In the Start Debugging dialog box, check Enable
Assembler Debugging.
- Click the TSO tab and delete whatever appears in the
Clist field. Then click on OK.
- The Application Output window appears. It is emulating
a TSO (a mainframe timesharing system) session. Enter the
TSO command call filename, where
filename is the name you chose for your source file.
Press Enter.
- The Application Output window now displays the Assembler
Debugger, which is also called the Animator.
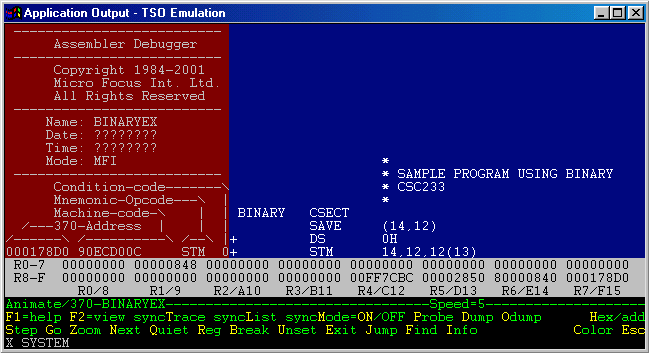
The left side of the Animator window shows the memory address
and the machine language translation for each statement. The
right side shows the assembler statements, including macro
expansions. The contents of the general purpose registers are
displayed near the bottom. At the bottom is the list of
Animator commands. To enter a command, type the letter which
is capitalized for that command. For example,
to run your program without interruption, enter z. To
execute your program one statement at a time, enter s.
- When your program is finished, enter the TSO command logoff.
This terminates the execution/debugging session.
Email Me |
Office Hours |
My Home Page |
Department Home |
MCC Home Page
© Copyright Emmi Schatz 2003